How to Make Pie Crust – The Complete Guide
Understanding all of the details for how to make pie crust is key for proper execution and success. Making a pie crust that is tender and flaky is not as complicated as it can seem, and these tips will help build your pie crust making confidence!

My goal of this complete guide to making pie crust is to give you confidence! I want you to be excited about your ability to make beautiful, flaky, tender pie crust!
The following table of contents will help you find different places in the article based on what you are looking to learn. You can also jump down to the recipe if that is what you’re looking for.
Watch the Video Tutorial
If you are more of a visual learner, my video tutorial will walk you through all of the details for how to master pie crust with confidence.
You can hover over the progress bar on the video to find different sections to jump to based on what you’re looking for.
Understanding the Function of Pie Crust Ingredients
Most standard pie crust recipes contain four basic ingredients: flour, salt, solid fat, and water. That’s it. The process of how to make pie crust is actually quite simple, but understanding your ingredients can help you make a few decisions about which recipe to use.

Fats
In a pie crust recipe, the fat serves the purpose of coating the flour to act as a barrier when your water is added. Essentially, the fat shortens the gluten strands and helps keep your crust flaky. For best results, you want to use a form of solid fat in a pie crust recipe. This is what will give you the most flakiness because the fat will stay in small tiny pieces throughout your dough. Many recipes for pie crust use a combination of two fats because each have different benefits for the crust.
Butter
Butter is desirable in pie crust recipes because of its flavor and low melting point. Butter has a melting point around 90-95F so it quite literally melts in your mouth. Crusts made with all butter tend to be lighter as well, due to the steam created from the water in the butter evaporating in the oven, causing layers to puff up.
There are a few drawbacks to an all butter crust though. Butter is not pure fat. Is is about 80-83% fat, depending on which butter you use, and the rest is made up of water. Because of this, all butter crusts tend to shrink a little more and are also at more risk for becoming tough during the mixing process than crusts made with 100% fats, such as shortening or lard.
Baking Tip: It might be wise to choose a crust that is all butter or a high ratio of butter in combination with another fat if the pie is definitely going to be eaten at room temperature or cold due to its low melting point.
Vegetable Shortening
Vegetable shortening is a partially hydrogenated fat that’s fat content is at 100%. For many years, it was regarded as the fat that made the best and flakiest pie crusts. It is true, due to its fat content, vegetable shortening does make a truly tender and flaky crust. However, it is important to note that vegetable shortening has a much higher melting point than butter, between 117-119F. An all shortening crust may not be desirable for a pie that will not be served warm due to the fatty film it can leave in your mouth.
Leaf Lard
Lard is making a comeback! It is quite literally the new coconut oil. Way back in the day, before the marketing of vegetable shortening tarnished it’s name, lard was the go to fat for pie crust. Much like shortening, because it is 100% fat, lard creates quite a lot of flakiness in baked goods. In fact, my absolute favorite biscuits are made with all lard! Lard does however, also have a higher melting point, around 110-119F, so an all lard or high ratio lard crust would be best suited for pies that will be served warm due to the fatty mouth-feel it can leave behind if at room temperature or cold.
Note: Leaf lard is the highest grade of lard and is snow white in color and very mild in flavor. It is the type of lard that should be used in pastry as to not add any pork flavor to the final product.
Liquids
Ice Water
Ice water is the go-to liquid for hydration of most all pie dough. The ice water serves to hydrate the dough and to keep the ingredients, mainly the fat, very cold so that it stays solid.
Vodka or Vinegar
In recent years, several bakers have developed pie crust recipes that enlist the help of vodka or vinegar as part of the hydration of the dough. When flour is hydrated with water gluten formation begins. The benefit to replacing some of the liquid with either vodka or vinegar is how these substances can inhibit the gluten formation process. The acidity in the vinegar will slow down the formation of the gluten strands. Similarly, an 80 proof vodka is only about 60% water and gluten cannot form in alcohol.
Note on Using Vodka or Vinegar: I have seen several seasoned bakers try out these techniques and claim that they make minimal difference in flakiness. The thing to keep in mind here is that vodka or vinegar in a pie crust is not making it more flaky, rather it is a little insurance policy for the risk overdeveloping gluten.
I recommend this technique to bakers who are either having issues keeping their crust tender or to brand new bakers who are still mastering the technique of making pie crust. Replacing some of the water with vinegar or vodka isn’t necessary for a seasoned baker who is already able to keep the crust very tender due to their technique.
Keeping the Crust Tender & Flaky
Cold Ingredients
One of the important steps I see most pie crust recipes leave out in the directions is to allow the dough to warm up slightly before rolling it out. I like to plan ahead and put everything I am going to be using to make my pie crust in the refrigerator at least an hour before I start. This includes my flour, my bowl, and my pastry cutter! Throw them all in the refrigerator. I keep my cut up butter and other fat in the refrigerator and actually transfer the fats to the freezer about 10 minutes before starting so they are ice cold.
The cold temperature will ensure that your fat stays solid when you are making your dough which is what creates the flakiness once it is baked. If your fats are too warm they will create one cohesive dough with the other ingredients and you will lose all of the flakiness.
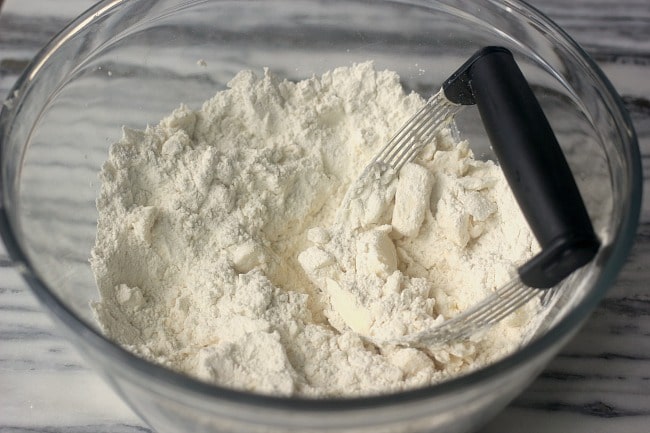
Cutting in Fat
Cutting in fat is the process of working the solid fat through the flour until it is in small pieces evenly distributed throughout the flour. This process coats the flour in fat, acting as a barrier to the water to inhibit gluten formation. The more chance the gluten has to form, the tougher your crust will be, so this is helping to inhibit that. Cutting the fat in also keeps solid pieces of fat present in the dough which is what creates flakiness when baked.
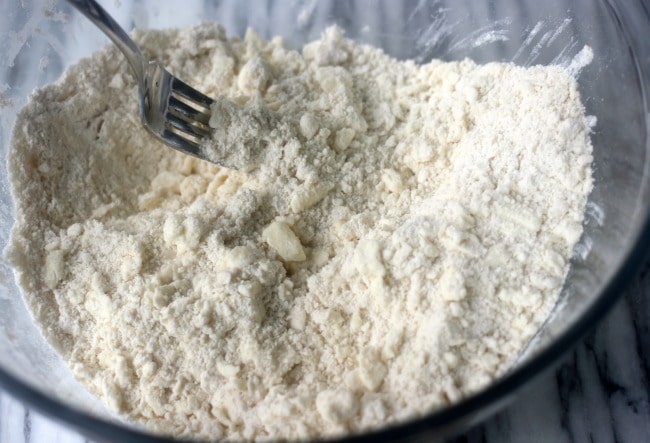
You can do this by using a pastry blender, a fork, your hands, a food processor, or some people like to grate their butter with a cheese grater.
I like to use my finger tips and press down on the fat to create little flat sheets of butter and/or shortening throughout the dough. This essentially The sheets of fat will essentially be laminated throughout the dough, creating a flakier crust. I demonstrate it in the clip below.
Be Gentle When Working in Your Liquid
Water is the necessary enemy of pie dough. It is needed to bind the flour and fat together so that a cohesive dough is created, but it is what starts the gluten formation leading to tough and dense crust if you are not careful.
The amount of water needed for a pie crust will vary day to day, depending on a number of environmental issues. Add the water, 1 tablespoon at a time, using a fork to mix it in. Very lightly, without mashing the fat and the flour down, nudge the flour/fat mixture around to combine it with the water.
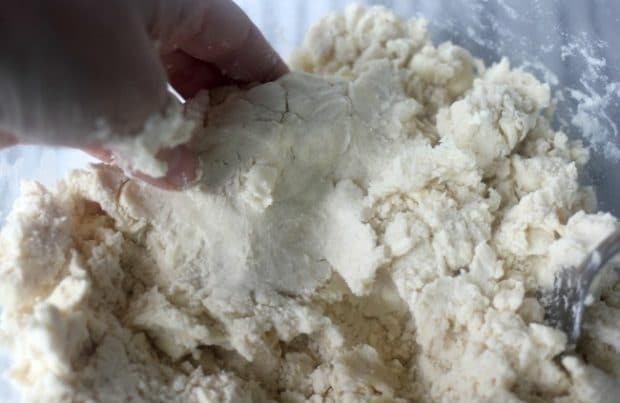
Once large clumps start forming, you can gather the dough and gently press it together. If it cracks and falls apart from itself, you need more water. If a ball forms that does not crumble, you have added enough water.
Let the Dough Rest
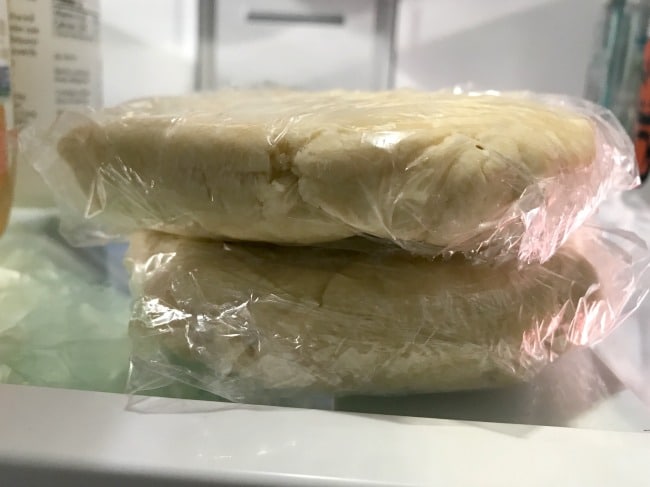
Okay, let’s talk about this dreaded resting period for pie dough. Don’t skip it. Just don’t. If you want a pie crust that is truly flaky and tender and doesn’t shrink up on you when baked, then this step is crucial. Chill the dough for an hour at the very least. The beautiful thing about pie dough is it can be kept in the refrigerator for up to 3 days and the freezer for 3 months, so you can definitely prep it ahead!
Resting the dough in the refrigerator before rolling it out serves three purposes. First, it allows all of the flour in the dough to hydrate, which will make it easier to roll out and cause a more even bake. Second, chilling the dough allows the gluten strands to relax after being worked. If you’ve ever tried to roll out pie dough, or pizza dough, just after it has been mixed then you may have wondered why the heck it keeps springing back and shrinking. This is because the gluten needs time to relax first. This is key to a crust that doesn’t shrink up in the oven. And lastly, the chilling time allows the fat to re-solidify so that it stays in tiny separate pieces when you roll it out.
Tips for Rolling Pie Crust
Avoid Rolling Out Rock Solid Dough
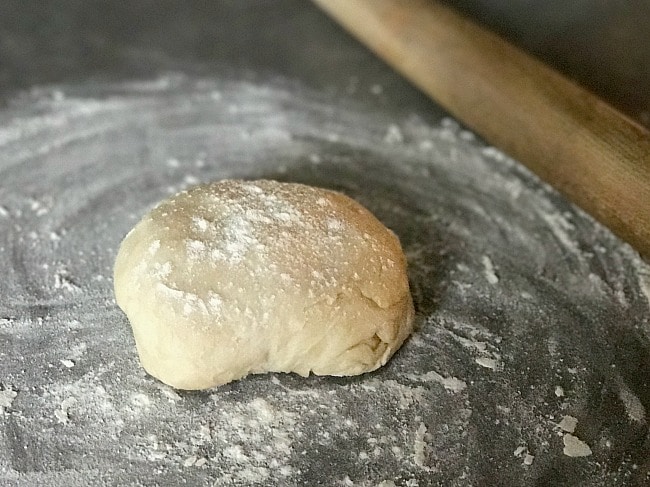
The process of rolling out the pie dough is where many crusts go south and start to get really tough. One of the things I see most pie crust recipes leave out in the directions is to let the dough warm back up slightly before rolling it out. Pie dough that has been in the refrigerator for several hours or even overnight is hard as a rock and attempting to roll it out at this stage is just setting yourself up to overwork it.
The refrigerator resting period is necessary for all of the reasons stated above, but let your dough sit out on the counter for a bit of time to allow it to return near room temperature before you attempt to start rolling it. If you only refrigerated it for the bare minimum of 1 hour, you might only need 5-10 minutes before it is ready to go. But if your dough has been refrigerated overnight you may need a good 30 minutes or more for the dough to return near room temperature before rolling it.
Rolling Surface
A clean, lightly floured counter or marble pastry board is my go-to for rolling out pie dough. The benefit of the marble pastry board is that it stays slightly cooler than room temperature so it keeps your dough cooler as well. You could also opt to roll your dough out between two pieces of parchment or wax paper. The benefit of this option is that you don’t have to use quite as much flour on your rolling surface and you don’t get flour all over your counter and yourself!
Pro Tip: If you opt to use parchment or wax paper as your rolling surface, place a damp paper towel or dish rag underneath the paper to keep it from sliding around as you are rolling.
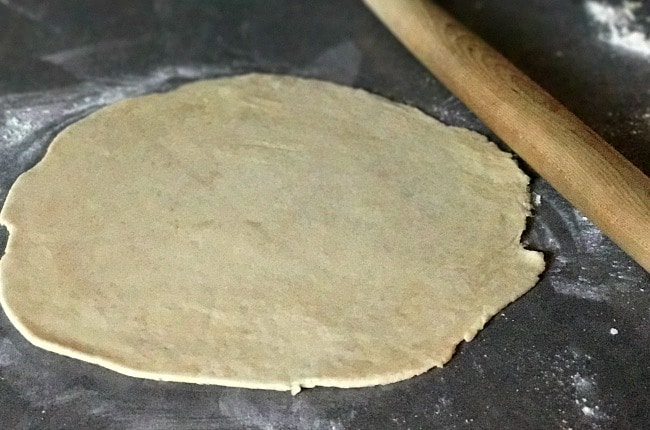
Rolling Technique
Before rolling out pie crust, it is best to gently shape your dough in the form of a circle. This will help you keep it fairly circular when rolling it out. Start with your rolling pin in the center and roll out the front edge, then come back to the center and roll out to the bottom edge. Then rotate the dough and repeat. You don’t want to roll back and forth from front edge to back edge over and over. This will make it very difficult to get a somewhat round dough and will also stretch and overwork the gluten in the dough. Keep rotating your dough with each front and back roll, and add a little more flour if it is starting to stick.
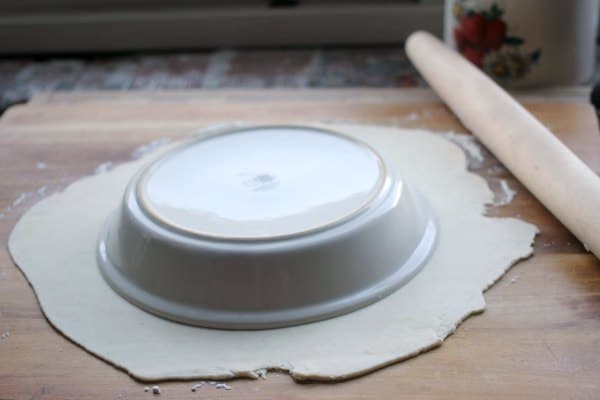
Pro Tip: When you roll out your dough, you want to roll it out several inches wider than the diameter of your pie plate. You want the crust to sit down into the pie plate easily without being stretched out. Stretching the dough will cause it to spring back and shrink when it is baked.
Transferring the Dough
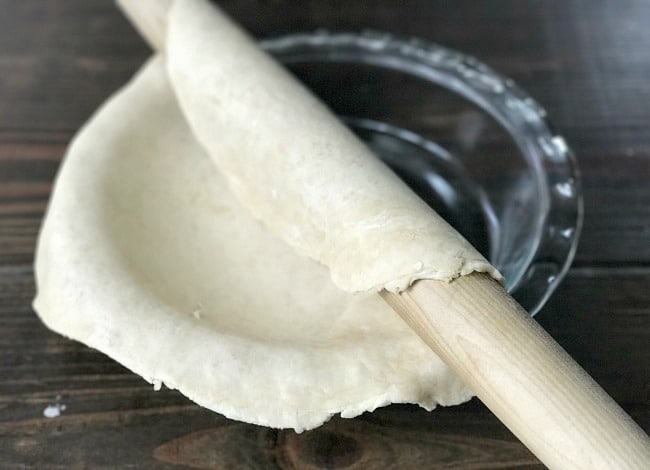
I find the easiest way to transfer your pie dough into your pie plate is to roll it over the top of your rolling pin and gently move it from the counter to the plate. Alternatively, you could fold the dough in half, then in half again and move the dough into the pie plate and unfold it.
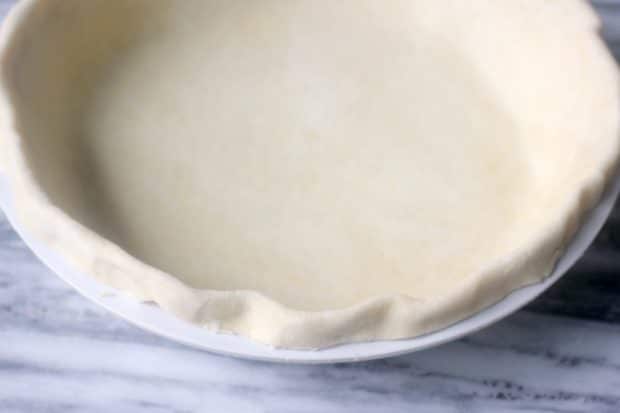
Once the dough is in the plate, life up on the sides and let the dough naturally fall into the bottom of the plate so that it is not stretched out. Stretching the dough will cause it to shrink in the oven.
Shaping the Dough
Single Crust
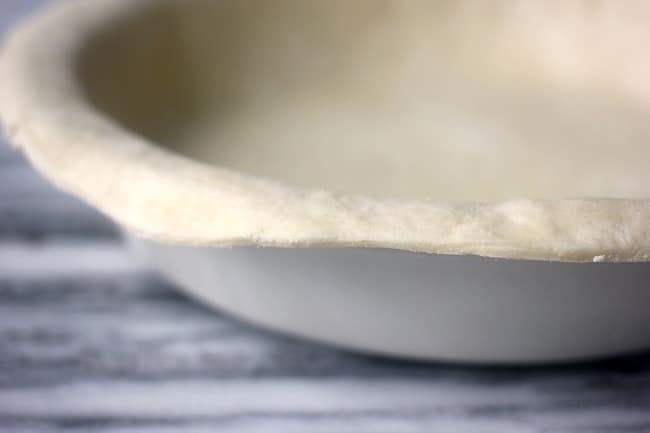
For a single crust pie, trip the edges of the crust about 1/2″ wider than the diameter of the pie plate.
Fold the edge under, creating a lip around the outside of the crust.
Classic Pinch Crimp
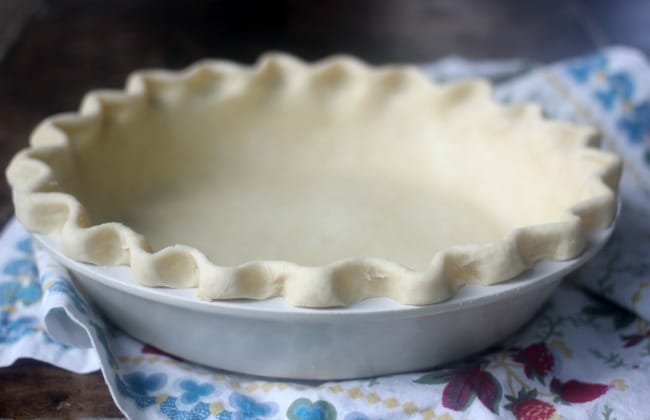
This is my go-to crimp for a single crust. Just use your pointer finger on the inside of the crust and press it between your other pointer finger and thumb on the outside of the crust.
Fork, Spoon, and Corkscrew Crimps
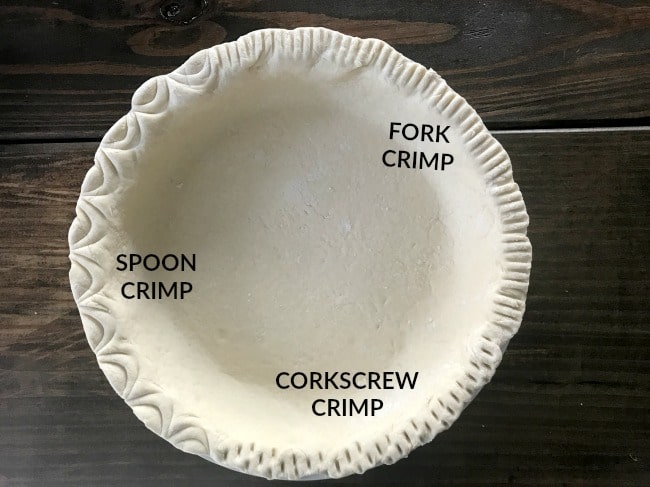
A variety of tools can be used to press into the side of the crust to create patterns. Above you see 3 examples, fork crimp, spoon crimp, and corkscrew crimp.
Decorative Cutout Edge
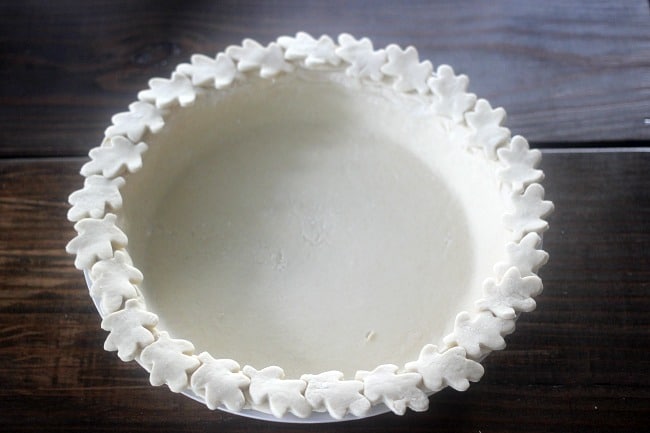
Pieces of pie crust can also be cutout with small cookie cutters to create a decorative edge.
Note: Any of the single crust styles can also be used to seal the edges of a double crust.
Double Crust
Simple Top Crust
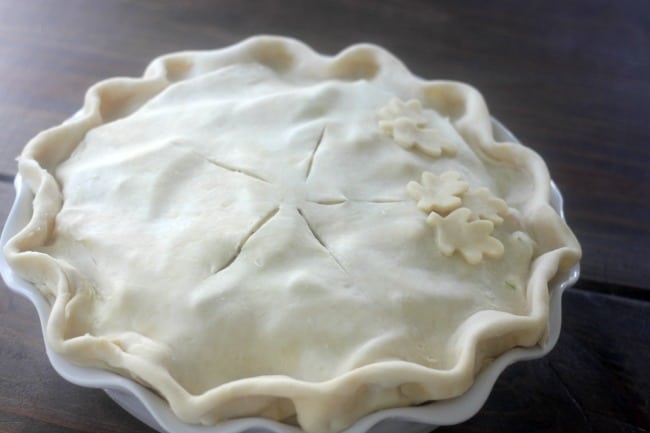
Roll out a piece of dough just like the bottom crust and lay it over the top of the pie filling. Cut a few slits in the center to vent. I like to also add a few decorative cutout pieces of dough to the top as well.
Lattice Crust
A lattice crust is such a stunning way to top a fruit pie. I particularly love it on a Strawberry Rhubarb Pie, but it’s also beautiful on Classic Apple Pie!

Roll out a piece of pie crust and cut it into thin strips. Lay the strips over the top of your filling evenly spaced out, going one direction.
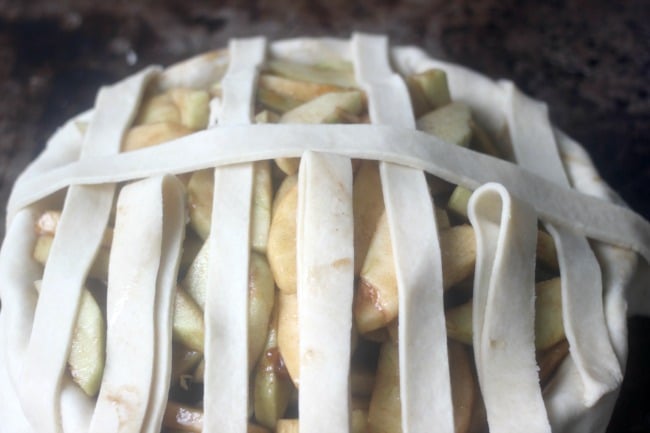
Pull every other piece of dough halfway back and lay a piece of dough over the filling going the opposite direction.
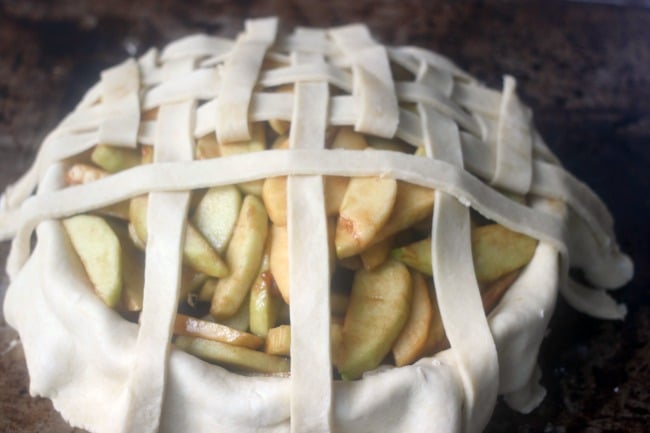
Fold the pieces back down over the new piece of crust and fold back the other pieces that were not folded back the first time. Lay another piece of dough over the filling and repeat this process until you have the top covered with woven pieces of dough.
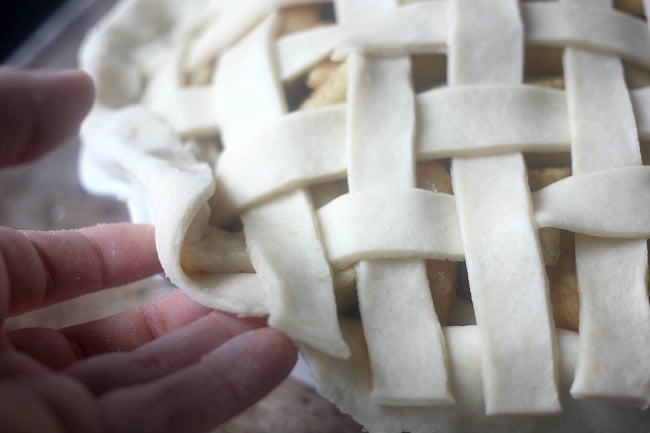
Trim the edge of the top and bottom crust so that they are a 1/2″ wider than the pie plate. Fold the bottom crust up over the top crust and pinch to seal. You can use any of the single crust techniques for crimping the sides.
Baking the Crust
Egg Wash
After your crust is formed, you can leave it as is or brush it with an egg wash to give it a nice golden color and shine when it bakes. Whisk 1 egg with 1 TBSP water and brush it on the top of the dough and around the edges. I also like to dust the crust with sugar to give it a nice crunch.
Chilling Before Baking
It is absolutely key to a flaky crust that the dough is very cold before it hits the oven. You want the fat to be solid so that the crust has a little time to start setting before the fat melts. This allows the fat to get trapped in little pockets of the dough once it starts melting, instead of just seeping out of the crust.
I like to put the pie in the freezer while the oven is preheating, about 15-20 minutes, before baking it.
Blind Baking
Blind baking is when you bake the crust without any filling in it. This is done for pies that have a filling that does not need to be baked, such as a custard filling.
To blind bake, make sure your crust is well chilled. Lay a piece of parchment paper over your crust and fill it with pie weights, beans, or rice. This will act as a makeshift filling so the crust doesn’t bubble up while its baking.
Cool the crust completely before adding your filling.
Troubleshooting
Tips to Avoid Pie Crust Shrinkage
The biggest factor in a pie crust shrinking has to do with the gluten development. The more the gluten is developed, the tighter the strands are, causing them to contract and shrink up. Make sure you are paying close attention to the tips about gently mixing and rolling out the dough.
Make sure that your crust is big enough for your pie plate and do not stretch it to make it fit. The more you stretch it, the more it will retract once it hits the oven. Once the crust is in the pie plate, lift up on the sides and let it fall down into the pie plate without stretching it.
Also make sure you do not skip the resting time in the refrigerator or freezer before baking it. This will allow the gluten strands to relax again after the dough has been shaped and will reduce the amount of shrinkage.
Tips to Avoid a Soggy Crust
If you are having problems with a soggy crust, you can partially blind bake the crust before you add your filling. This will help the crust to seal and create a barrier before you add your filling.
It could also be helpful to place a baking sheet in the oven while you are preheating your oven. Place your pie on the hot baking sheet when it goes into the oven. The heat from the baking sheet will help to quickly set and crisp up your crust.
Tips to Avoid Over-Browning the Crust

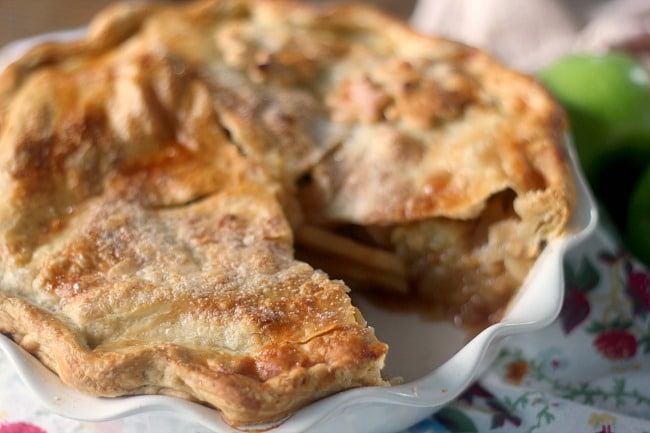
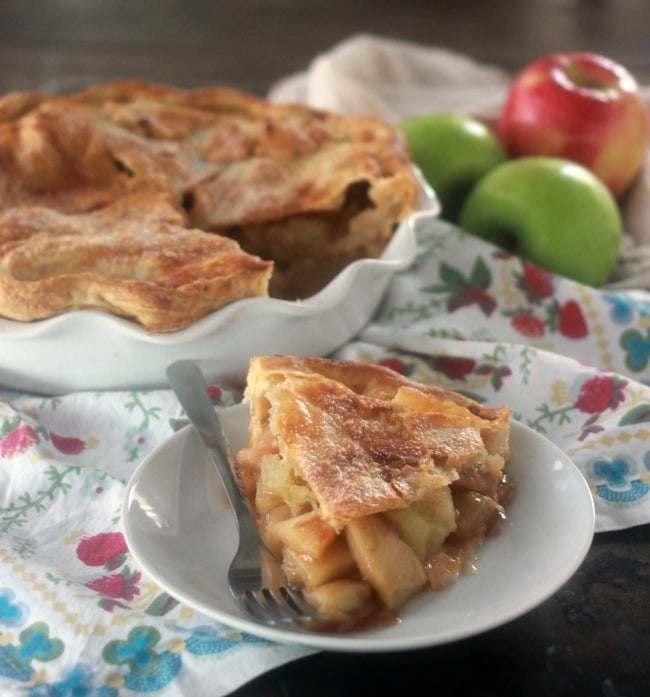
If your crust is starting to brown too quickly before your pie filling is set, you can cover the dark spots with foil while the crust continues baking. As you can see above, a few spots on my apple pie were getting too dark so I covered just those spots and let the rest be uncovered so they could catch up.


Perfect All-Purpose Pie Crust
This pie crust recipe is perfect for any pie whether sweet or savory. The high ratio of butter in the crust makes it taste amazing, while the benefit of the small addition of lard or shortening creates more flakiness without leaving a lot of fatty film in your mouth.
Ingredients
For a Single Crust
- 150 g (1 1/4 cup) all-purpose flour
- 1/2 tsp kosher salt
- 70 g (5 TBSP) unsalted butter, cold (*see notes for substitution)
- 25 g (2 TBSP) shortening or lard, cold (*see notes for substitution)
- 2-4 TBSP ice water (*see notes for using part vodka or vinegar to ensure a flaky crust)
For a Double Crust
- 300 g (2 1/2 cups) all-purpose flour
- 1 tsp kosher salt
- 140 g (10 TBSP) unsalted butter, cold
- 50 g (1/4 cup) shortening or lard, cold
- 4-8 TBSP ice water (*see notes for using part vodka or vinegar to ensure a flaky crust)
Instructions
- Before starting your crust, cut your butter into small 1/2" pieces and place it in the freezer to get very cold for about 15 minutes while you organize the rest of your ingredients.
- In a large mixing bowl, whisk together the flour and salt. Add the shortening to the bowl and use a pastry cutter or a fork to cut the fat through the flour until it is evenly distributed in pea size pieces.
- For the flakiest crust: pour the flour mixture into a gallon ziptop bag and add in the butter. Push all of the air out of the bag and seal. Shake up the flour and butter until it is evenly distributed. Roll a rolling pin over the bag, flattening out the butter until it is all in very thin flakes. Return the mixture to the bowl. Alternatively: you can just add the butter to the mixing bowl and use a pastry cutter or a fork to cut it in until it is the texture of coarse meal.
- Add ice water to the bowl 1 tablespoon at a time and use a fork to gently nudge the flour into the water. Do not aggressively stir or mash the flour and butter down. Be as light and gentle as possible. Once large clumps of dough start forming, gather the dough up and press it together. If it crumbles then you need to add a little more water. If it holds together then you are ready to chill.
- Press the dough together into a ball. If you are making a double crust, split it in half. Wrap the dough in a piece of plastic wrap, pressing it down into a disk, and refrigerate for at least an hour or up to 3 days before using. This step is key to relaxing the gluten and allowing the dough to hydrate properly.
- Before rolling out the dough, allow it to come back near room temperature.
Notes
Raw pie dough will keep for up to 3 days in the refrigerator or 3 months in the freezer.

48 Comments on “How to Make Pie Crust – The Complete Guide”
I’m making Apple Pie today ! Thank you !
You’re welcome, Dawn! Send me a pic!
Wow, that is a lot of great information! You really did an awesome job!
Thank you Janet! There is just so much to say about pie crust!
Thank you for sharing all this great information!
You are so welcome Deb! I hope it is useful!
It’s Canadian Thanksgiving here this weekend, Oct. 9, and as always this is the weekend I make my big batch pastry recipe so I’ll have extra in the freezer for the upcoming winter pot pies and other winter pies. I use all lard, as that’s what my Mother and Grandmother always used, not to mention the fact it’s never failed me.
Basic amounts are 5/1/2 cups AP flour or 6 cups pastry flour, one pound of lard, 1 1/2 teaspoons salt, 1 large egg beaten in measuring cup then 1 tablespoon white vinegar and cold water added to measuring cup to the one cup level. Do the usual for bringing the pastry together. I do however at times, use equal lard and butter instead of all lard if I’m to make a French tart and such.
This time however, my very dear and close friend will most likely die this weekend from cancer, so made her big batch pastry recipe to honour her by replacing the water I’ve always used with her instructions to use milk, plus her instructions to add a teaspoon of baking powder and two teaspoons of powdered sugar.
Have to say, my dear friends recipe came together like a dream, and will be used for our Thanksgiving pumpkin and apple pies.
As always your newsletters are very enjoyable to read as they are so very informative for new bakers ( such as my granddaughters and one young grandson who’s taken a keen interesting in baking ) and for not so new home bakers like this mother, grandmother and great grandmother that loves learning new things everyday.
I Thank you for that
Thank you so much for your thoughtful note, Joycelyn! I’m very sorry to hear of your friend’s illness. I love how you chose to honor her. What a special memory to always hold dear. It is my absolute pleasure to teach and inspire other bakers like you and your family members. Thanks for your faithful following!
You don’t mention oven temperature for blind baking.
Hi Chris! I usually blind bake my crust at 425F for 12-14 minutes, or until it is a deep golden brown.
I LOVE THIS POST-and that rolling the butter technique is amazing, I’m so going to need to try it!
Awwww thanks lady!
Thank you Bettie for the professional details about a perfect pie. It was great help! Cause i have no one around and it gave me a sense of a skillful cook by my side.
Thank you for the information on making a pie crust. I have tried several different times and the never came out right before watching and reading your instructions. I look forward to the next time I make one now that I know what and how to do it. I love your recipes and instructions. Yes I read the whole thing.
Should i put pie weights in the crust to blind bake or prick the crust? I love your web site and all the recipes I’ve tried so far.
What is th correct temperature to blind bake our crust and for how long do you bake it?
Thank you for sharing your thoughts and ideas. So much helpful. Wonderful.
How much vinegar or vodka do you put in the ice water
You can replace half of the water amount with either vodka or vinegar.
So do you use the vinegar in place of the water?
Never mind I overlooked that part!
Thanks!
🙂
Best shortcrust pastry I have ever made. Used my food processor.. gently.. chilled overnight. Kept everything chilled throughout the process.
I noticed on the shelf behind you, what looked like a Sunbeam stand mixer. I have never seen another one before watching your video and it may seem silly, but I got a little excited; sentiment I guess. I have my grandmothers, with clear glass bowls, and it still works!
Wonderful! I love them so much. I’ve been collecting them from antique stores near me.
This is my grandma and her moms EXACT recipe and technique! Such a classic.
Awesome! It’s definitely a keeper 🙂
Could you add brown or white sugar to this recipe? If so how much for a single and double crust?
Yes, you can. I would recommend only 1 tsp- 1 TBSP of sugar per pie crust.
Can you also make the pie crust and freeze it already formed. If so suggestions on how to wrap.
Thank you
You can! If you’re using a metal tin you can place the whole tin in a large gallon ziploc bag in the freezer. If you’re using glass or ceramic, you can wrap it really well with plastic wrap.
I learned these things watching my French Grandmother do pastry when I was a kid, but kind of forgot some of the necessary steps to a shortcrust success. As she used to tell me “It is all technique, Oui? Watching you do this brought back all of those memories as to how to handle pie dough. I was like watching her, hands and all. Using your methods I have had a whopping success at Thanksgiving this year. My Mince Pie was a big hit. You are an Éducatrice Formidable. Thank you and Rock Chalk! Cannot wait to get your Cookbook (it’s on order)
Please add me to the mailing list.
I just did, thanks!
what temp for filled pie and how long do you bake
Is it possible to include a roll-and-fold before wrapping in plastic film and resting in the fridge, for extra flakiness? Just wondered. Thanks.
Yes! That would work.
Thanks for replying so promptly. There’s apple pie on the radar this week. 🙂
I just watched your video on making pie crust ~Thank You ~ delightful, well covered
directions ~ also shared with two Daughters and Granddaughters ! Looking forward to my first hands on lesson with your instructions ~ Bless You Dear Bettie
Thanks for all of your great tutorials. I made my first pie crust yesterday. It was a single pie crust for a pumpkin pie and it turned out pretty tough. I may have added a bit too much water, not sure since this is my first homemade pie crust in some time. Could this have made it tough, or did I do something else that caused it to be tough? Thanks for any guidance you can provide. Again, thanks for all you do to help us novices.
When the recipe calls for AP flour, do I need to use unbleached flour or can I use bleached?
Thank you, looking forward to making pie crust…
First, thank you for your website and videos. You are my go to source for all things baking.
I made a pie crust for a no bake blueberry pie and it tasted good and was flaky but it was tough. I couldn’t cut through it with a fork. Would this be due to overworking, too much water or overbaking? I may have done all three. I’m not sure.
1. I turned the mixture onto my counter when it wasn’t quite all together (it looked more similar to when you transfer your scone dough to the counter). I tried to bring it together there with some more water.
2. I baked it till the base had some color. Is that too much?
Any thoughts appreciated!
Hi! Yes, the dough may have been overworked when mixing or rolling cause it to become tough. Was it too thick? It sounds like you baked it correctly.
Every single person who commented how great my pie crust was tonight at Thanksgiving (and it was a LOT of people) got an earful on the science of baking thanks to your book and this recipe. I can’t tell you how many people I told “oh it’s not hard when you know the science!” and recommended your book when they said they could NEVER make a homemade crust. Thank you for the recipe and the science behind it, I am already looking forward to my next chance to bake a pie!
I made my second pie with lard this week. I have good quality leaf lard. Pure white. The pie I made was dried apricot pie. I felt the crust tasted a bit “porky” when I tasted it. Is this an acquired taste I will be used to tastier coup have done something wrong?
In an Old hand at making pie crusts, so I’m excited when i can learn new things. Baker Bettie has some wonderful tips. I usually make an all butter crust but after reading her recipe i decided to try adding some shortening to it with less butter. It’s delicious and does not shrink as much in the hot oven. I will add, that instead of using a cutting tool like Bettie, i use my hands to rub the butter onto the flour like i learned from my mother. It makes the pastry more flaky. Bettie gives great step by step directions in all of her recipes which are terrific. I’ve tried many of her recipes and really enjoy them. I’m 79 and so happy to learn new things in baking. Bettie i hope you try running the butter into the flour.
I meant rubbing not running on my last comment
I read that adding vinegar also prevents the pie crusts from getting that grayish hue if you’re storing in fridge for a few days before baking or freezing before baking. I’ve had it take on that grayish color as written above. Do you agree with this vinegar tip?